If you are, like many of us, baffled by the wide range of ways to stream videos from the Web to your computer or your television today, check out my "Streaming Media 101: Do You Hulu?" Google Doc.
The article is a work in progress, and I'm continually revising it and adding to it. If you have any questions or concerns that you would like me to address in the article, please feel free to leave a comment to this blog post telling me what changes or additions you'd like to see. Thanks.
Saturday, March 26, 2011

Saturday, March 12, 2011
TiVo to Mac to Apple TV — Part II, Capturing Captions
In TiVo to Mac to Apple TV — Part I, Moving Movies I showed how to make Apple TV videos out of TiVo recordings of old movies shown on the Turner Classic Movies HD channel — or, for that matter, of any TV shows your TiVo has recorded and that you have downloaded to your Mac.
The workflow I gave there works miracles, but one miracle it cannot work is adding subtitles to an Apple TV-compatible video file.
TCM HD shows its movies — the vast majority of them — with closed captioning for the hearing-impaired, of whom I am one. When I, using kmttg, download one of these TCM HD recordings to my Mac, the closed captions come along for the ride. They're embedded in the digital video stream.
Let's say, for example, that I download a recording of the 1956 movie The Searchers from my TiVo Premiere to my Mac. A copy of the recording appears on my Mac in a file called The Searchers.TiVo. (The actual The Searchers ________.TiVo filename as saved by kmttg would contain the date of the original recording in place of the ________, but I'll ignore the inclusion of the date in the filename for purposes of this post.) I can then tell VideoReDo TV Suite version 4 with H.264 (VRD) to trim off the unwanted extra material at the beginning and end, and to save the result in a new Mac file. (To use VRD on a Mac, you also have to employ the likes of Parallels Desktop 6 for Mac to let the Mac run Windows.)
If I used the previous post's workflow, I would save the final result as The Searchers.mp4, a video "container" or "wrapper" file in the MPEG-4 format. That file would house an H.264 video stream along with an AAC audio stream. It could in fact be added to my iTunes movie library and played successfully on my Apple TV. The only problem is, VRD isn't presently capable of turning the closed captions in the original MPEG-2 file into subtitles in the MPEG-4/H.264 output file, the one that would be given an .mp4 filename extension.
That's a shame, because the Apple TV is perfectly capable of rendering subtitles that are contained in .mp4 files. An especially nice feature of the way it does so is that the user can turn subtitle rendering on and off for any particular video file at any moment in time, on the fly, while viewing the video on the TV to which the Apple TV connects.
When subtitles can be turned on and off at the whim of the user, they're called "soft" subtitles. When a video's subtitles can't be turned off and on — they're "burned into" the image, so to speak, and they're always "on," and so the video player (the Apple TV, in this case) simply can't turn them off — they're "hard" subtitles.
That's the difference between "hard" and "soft" subtitles. Now, how can I give my .mp4 files soft subtitles?
Step 1
The first step I do is to tell VRD to create a The Searchers Trimmed.mpg output file containing my trimmed selection of video material. The filename extension is now .mpg instead of .mp4. That means the VRD output file is an MPEG-2 "container" file that houses, basically, the selected swath of the original video ... and this time it's not going to be re-encoded to a different format, i.e., MPEG-4/H.264.
Step 1 goes pretty fast — about half an hour for a two-hour movie — because VRD is doing a "fast frame copy" instead of a major re-encoding of the video.
This way of doing things means the closed captioning embedded in the original video gets passed to the output The Searchers Trimmed.mpg video file absolutely intact.
Step 2
Next, I pass The Searchers Trimmed.mpg as input to CCExtractor, an application I run on my Mac from the command line in Terminal.
CCExtractor creates, over a period of perhaps ten minutes, a text file called The Searchers.srt that contains the closed captions themselves, along with timing information to show when and for how long each caption should be displayed.
Step 3
Now I use HandBrake — specifically, I use the Mac GUI version — to re-encode The Searchers Trimmed.mpg, the output file I made when I used VRD in Step 1, as The Searchers Trimmed.m4v. The .m4v extension indicates an MPEG-4/H.264 video file that is internally constructed in a format that is specifically compatible with QuickTime, iTunes, and Apple TV. In other words, it's not a "generic" MPEG-4/H.264 video file; if it were, it would have an .mp4 filename extension instead.
That's how I use HandBrake's GUI interface to tell it that, in re-encoding the original The Searchers Trimmed.mpg file as The Searchers Trimmed.m4v, it should use an external SRT file as a source of subtitles. This external file is, of course, The Searchers Trimmed.srt, as output earlier by CCExtractor. By expressly telling HandBrake not to burn these subtitles in, I in effect order it to produce soft, rather than hard, subtitles in its The Searchers Trimmed.m4v output file.
I also tell HandBrake to use my own specially constructed "My Apple TV 2 960x544" preset, which yields an .m4v output file that has 960x544-pixel video resolution at 29.97 frames per second. That resolution is exactly half of the input's in both the horizontal and vertical directions, while the frame rate of the output is the same as that of the input. I expressly tell HandBrake to do no cropping of the original image, so any black bars in the original will show up unchanged in the copy. (Purists will hate that, but I believe HandBrake operates more quickly this way, since cropping necessitates that it compute non-square, anamorphic pixels from the input's square, non-anamorphic ones.) I'm using HandBrake's RF 20 "constant quality" video quality setting, which I feel gives me perfectly acceptable video quality all through the movie.
Fair warning: This step can take a long time — up to six hours or so for a two-hour movie, depending on how slow your Mac is. Re-encoding a two-hour .mpg file as an .m4v can be a lengthy process, and adding soft subtitles makes it even longer.
Step 4
Finally, after the long wait for Step 3 to finish is over, I can add The Searchers Trimmed.m4v to my iTunes movies library. Before I do so, in its Finder window I'm going to rename it The Searchers (SS).m4v so that I'll remember from here on out that it contains soft subtitles. When I add it to my iTunes movies library, it will have the iTunes-internal name The Searchers (SS).
It is my custom to, at this juncture, type Command-I to bring up iTunes' Get Info window on the newly added movie and add poster art via the Artwork tab. (I find the poster images in Google Images by Googling, for instance, "the searchers" poster.) I add information under other tabs as well — usually, Description, under the Video tab, and Year, under the Info tab.
These informational nuggets I obtain by opening The Searchers.TiVo.txt in TextEdit. The Searchers.TiVo.txt is a file that gets created by kmttg way back in Step 1, by virtue of having that application's Metadata option checked at the time I download The Searchers.TiVo from my TiVo to my Mac. The Searchers.TiVo.txt contains such "metadata" items as title, seriesTitle, description, time, mpaaRating, movieYear, and so forth and so on, for each movie that the TCM HD channel shows.

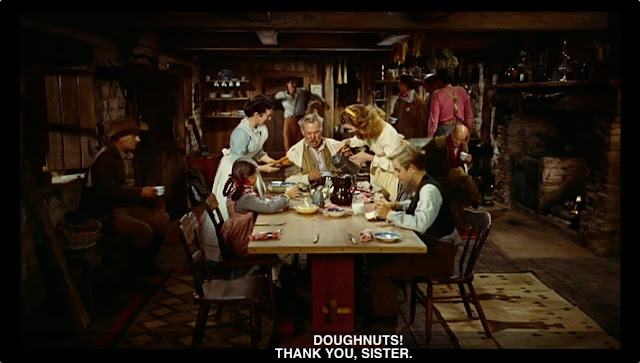
... or not, as the mood strikes me.
I can likewise play The Searchers (SS).m4v in QuickTime Player, or in VLC ... or, via iTunes on my Mac, on my Apple TV. In each of those players, optionally turning on the "English" subtitles lets me view text that originally started out as closed captioning in the TCM HD cablecast stream.
And that's it! There are no more steps ...
... however, I should add that it's OK to delete:
The only file you absolutely need to keep is The Searchers Trimmed.m4v. (I also tend to keep The Searchers.TiVo.txt, because it has other uses that I won't detail here.)
You may nevertheless choose to keep both The Searchers Trimmed.mpg and The Searchers Trimmed.srt, if (see Apple's New AirPlay Comes to Air Video) you want to be able to use the Air Video iPad/iPhone/iPod Touch app to send Air Video playback of (in this example) The Searchers Trimmed.mpg from the handheld mobile device to a big TV screen in your home, using Apple's new AirPlay/Home Sharing capability. In this Air Video/AirPlay scenario, your Apple TV is again used as an intermediary device.
If you also save the The Searchers Trimmed.srt file, Air Video will optionally (when doing a "Live Conversion") superimpose subtitles from it over top of the video on the touchscreen of the handheld iPad/iPhone/iPod Touch device ... and also over top of the video on the large HDTV screen to which the video + audio playback is being routed via AirPlay.
Still and all, it's not really necessary to keep The Searchers Trimmed.mpg and The Searchers Trimmed.srt as a means of being able to view subtitles during Air Video/AirPlay playback, since The Searchers Trimmed.m4v can reproduce its soft subtitles during Air Video play as well as during the more direct scenario of play via iTunes.
The workflow I gave there works miracles, but one miracle it cannot work is adding subtitles to an Apple TV-compatible video file.
TCM HD shows its movies — the vast majority of them — with closed captioning for the hearing-impaired, of whom I am one. When I, using kmttg, download one of these TCM HD recordings to my Mac, the closed captions come along for the ride. They're embedded in the digital video stream.
Let's say, for example, that I download a recording of the 1956 movie The Searchers from my TiVo Premiere to my Mac. A copy of the recording appears on my Mac in a file called The Searchers.TiVo. (The actual The Searchers ________.TiVo filename as saved by kmttg would contain the date of the original recording in place of the ________, but I'll ignore the inclusion of the date in the filename for purposes of this post.) I can then tell VideoReDo TV Suite version 4 with H.264 (VRD) to trim off the unwanted extra material at the beginning and end, and to save the result in a new Mac file. (To use VRD on a Mac, you also have to employ the likes of Parallels Desktop 6 for Mac to let the Mac run Windows.)
If I used the previous post's workflow, I would save the final result as The Searchers.mp4, a video "container" or "wrapper" file in the MPEG-4 format. That file would house an H.264 video stream along with an AAC audio stream. It could in fact be added to my iTunes movie library and played successfully on my Apple TV. The only problem is, VRD isn't presently capable of turning the closed captions in the original MPEG-2 file into subtitles in the MPEG-4/H.264 output file, the one that would be given an .mp4 filename extension.
That's a shame, because the Apple TV is perfectly capable of rendering subtitles that are contained in .mp4 files. An especially nice feature of the way it does so is that the user can turn subtitle rendering on and off for any particular video file at any moment in time, on the fly, while viewing the video on the TV to which the Apple TV connects.
When subtitles can be turned on and off at the whim of the user, they're called "soft" subtitles. When a video's subtitles can't be turned off and on — they're "burned into" the image, so to speak, and they're always "on," and so the video player (the Apple TV, in this case) simply can't turn them off — they're "hard" subtitles.
That's the difference between "hard" and "soft" subtitles. Now, how can I give my .mp4 files soft subtitles?
Step 1
The first step I do is to tell VRD to create a The Searchers Trimmed.mpg output file containing my trimmed selection of video material. The filename extension is now .mpg instead of .mp4. That means the VRD output file is an MPEG-2 "container" file that houses, basically, the selected swath of the original video ... and this time it's not going to be re-encoded to a different format, i.e., MPEG-4/H.264.
 |
| When you start VRD, you'll see this window. Click on the "Open Video" button ... |
 |
| You see an "Open" dialog. Navigate to the (in this example) The Searchers.Tivo file and open it ... |
 |
| Now, use VRD's editing tools to select a swath of the input video to save. Then, click on the "Save As" button ... |
 |
| Clicking on the "Save As" button brings up another dialog. If "Save as type:" is not already set to "MPEG2 Program Stream (*.mpg)" click the V button to get ... |
 |
| In the drop-down menu, select "MPEG2 Program Stream (*.mpg)". After the drop-down menu disappears, click on "Save" in the "Save As" dialog ... |
 |
| The VRD window will shrink to become a small window with a progress bar while the "Fast Frame Copy" is happening. When it's done, the small window will replaced with one confirming the completion of the output operation. When you click "OK," the main VRD window reappears. You can close it at this point. |
Step 1 goes pretty fast — about half an hour for a two-hour movie — because VRD is doing a "fast frame copy" instead of a major re-encoding of the video.
This way of doing things means the closed captioning embedded in the original video gets passed to the output The Searchers Trimmed.mpg video file absolutely intact.
Step 2
Next, I pass The Searchers Trimmed.mpg as input to CCExtractor, an application I run on my Mac from the command line in Terminal.
 |
| Drag the CCExtractor icon from the Desktop and drop it on a new Terminal window ... |
 |
| Now, drag the (in this example) The Searchers Trimmed.mpg file from Step 1 and drop it on the Terminal window, and press Return ... |
 |
| CCExtractor will begin extracting the closed captions from the The Searchers Trimmed.mpg file ... |
 |
| When CCExtractor is done, the Terminal window looks like this. A file called The Searchers.srt will now be in the same folder as The Searchers.mpg is in. You can quit the Terminal application. |
Step 3
Now I use HandBrake — specifically, I use the Mac GUI version — to re-encode The Searchers Trimmed.mpg, the output file I made when I used VRD in Step 1, as The Searchers Trimmed.m4v. The .m4v extension indicates an MPEG-4/H.264 video file that is internally constructed in a format that is specifically compatible with QuickTime, iTunes, and Apple TV. In other words, it's not a "generic" MPEG-4/H.264 video file; if it were, it would have an .mp4 filename extension instead.
 |
| Here, I have selected The Searchers Trimmed.mpg as the input file to HandBrake. The output file will be called The Searchers Trimmed.m4v. For purposes of re-encoding the input file, I'm using a group of video and audio parameters called "My Apple TV 2 960x544," which I have previously defined. |
 |
| I've clicked on the Subtitles tab, then on the "Add External SRT ..." button, to get the following file selection dialog ... |
 |
| I choose The Searchers Trimmed.srt ... |
 |
| ... and I see this. Notice that I have not clicked the "Burned In" checkbox, although I've clicked the "Default" checkbox so that these will be the default subtitles to be used during playback. (Actually, they're the only subtitles I've specified, but it's theoretically possible to specify more than one set.) Now I'm ready to begin creating my The Searchers Trimmed.m4v output file, so I click on the "Start" button near the upper left corner, and pretty soon I see ... |
 |
| The progress bar at the bottom of the window may crawl along for several hours. |
That's how I use HandBrake's GUI interface to tell it that, in re-encoding the original The Searchers Trimmed.mpg file as The Searchers Trimmed.m4v, it should use an external SRT file as a source of subtitles. This external file is, of course, The Searchers Trimmed.srt, as output earlier by CCExtractor. By expressly telling HandBrake not to burn these subtitles in, I in effect order it to produce soft, rather than hard, subtitles in its The Searchers Trimmed.m4v output file.
I also tell HandBrake to use my own specially constructed "My Apple TV 2 960x544" preset, which yields an .m4v output file that has 960x544-pixel video resolution at 29.97 frames per second. That resolution is exactly half of the input's in both the horizontal and vertical directions, while the frame rate of the output is the same as that of the input. I expressly tell HandBrake to do no cropping of the original image, so any black bars in the original will show up unchanged in the copy. (Purists will hate that, but I believe HandBrake operates more quickly this way, since cropping necessitates that it compute non-square, anamorphic pixels from the input's square, non-anamorphic ones.) I'm using HandBrake's RF 20 "constant quality" video quality setting, which I feel gives me perfectly acceptable video quality all through the movie.
Fair warning: This step can take a long time — up to six hours or so for a two-hour movie, depending on how slow your Mac is. Re-encoding a two-hour .mpg file as an .m4v can be a lengthy process, and adding soft subtitles makes it even longer.
Step 4
Finally, after the long wait for Step 3 to finish is over, I can add The Searchers Trimmed.m4v to my iTunes movies library. Before I do so, in its Finder window I'm going to rename it The Searchers (SS).m4v so that I'll remember from here on out that it contains soft subtitles. When I add it to my iTunes movies library, it will have the iTunes-internal name The Searchers (SS).
It is my custom to, at this juncture, type Command-I to bring up iTunes' Get Info window on the newly added movie and add poster art via the Artwork tab. (I find the poster images in Google Images by Googling, for instance, "the searchers" poster.) I add information under other tabs as well — usually, Description, under the Video tab, and Year, under the Info tab.
These informational nuggets I obtain by opening The Searchers.TiVo.txt in TextEdit. The Searchers.TiVo.txt is a file that gets created by kmttg way back in Step 1, by virtue of having that application's Metadata option checked at the time I download The Searchers.TiVo from my TiVo to my Mac. The Searchers.TiVo.txt contains such "metadata" items as title, seriesTitle, description, time, mpaaRating, movieYear, and so forth and so on, for each movie that the TCM HD channel shows.
I also employ a little trick, while I'm editing the movie's Get Info window in iTunes: I set it's Genre to the first letter of its name! In the case of The Searchers (SS), I set Genre to "S." Doing this lets me, when I'm looking at my movies library on my Apple TV, select the Apple TV's View by Genre tab and then see, in effect, an alphabetical index into my movies library!
Here's what it all looks like in the main iTunes window on my Mac (click on the image to enlarge it):

At this point, I am able to play The Searchers (SS) in iTunes on my Mac, which I can tell to show the "English" subtitles during playback ...

... or not, as the mood strikes me.
I can likewise play The Searchers (SS).m4v in QuickTime Player, or in VLC ... or, via iTunes on my Mac, on my Apple TV. In each of those players, optionally turning on the "English" subtitles lets me view text that originally started out as closed captioning in the TCM HD cablecast stream.
And that's it! There are no more steps ...
... however, I should add that it's OK to delete:
- The The Searchers.TiVo file that was downloaded by kmttg
- The The Searchers Trimmed.mpg file that was output by VideoReDo
- The The Searchers Trimmed.srt file that was output by CCExtractor
The only file you absolutely need to keep is The Searchers Trimmed.m4v. (I also tend to keep The Searchers.TiVo.txt, because it has other uses that I won't detail here.)
You may nevertheless choose to keep both The Searchers Trimmed.mpg and The Searchers Trimmed.srt, if (see Apple's New AirPlay Comes to Air Video) you want to be able to use the Air Video iPad/iPhone/iPod Touch app to send Air Video playback of (in this example) The Searchers Trimmed.mpg from the handheld mobile device to a big TV screen in your home, using Apple's new AirPlay/Home Sharing capability. In this Air Video/AirPlay scenario, your Apple TV is again used as an intermediary device.
If you also save the The Searchers Trimmed.srt file, Air Video will optionally (when doing a "Live Conversion") superimpose subtitles from it over top of the video on the touchscreen of the handheld iPad/iPhone/iPod Touch device ... and also over top of the video on the large HDTV screen to which the video + audio playback is being routed via AirPlay.
Still and all, it's not really necessary to keep The Searchers Trimmed.mpg and The Searchers Trimmed.srt as a means of being able to view subtitles during Air Video/AirPlay playback, since The Searchers Trimmed.m4v can reproduce its soft subtitles during Air Video play as well as during the more direct scenario of play via iTunes.
Thursday, March 3, 2011
TiVo to Mac to Apple TV — Part I, Moving Movies
 |
| 2nd-Generation Apple TV |
It's a good way to avoid buying DVDs. Unfortunately, there's no really simple way to send movies from a TiVo to an Apple TV. One reason is that programs recorded on a TiVo are in a different digital-video format than the Apple TV can use.
So I have to:
- Move each "keeper" movie from my TiVo to my Mac over my home WiFi network. The Mac software I use to do that is kmttg. It makes a file on my Mac that contains a copy of the original TiVo recording. That file has .TiVo as its filename extension. See Archive HDTV Recordings to Your Mac, Then Stream Them Back to Your TiVo! for more about how to use kmttg.
- Decode the Mac copy of the recording so that it is no longer encrypted. That makes it into an unencrypted video container/wrapper file in the MPEG-2 format, with an .mpg filename extension.
- Edit the MPEG-2 container file to remove any unwanted sections. The movies I record from Turner Classic Movies HD usually have a lot of trimmable material (sorry, Robert Osborne and Ben Mankiewicz) prior to the start of the actual movie, plus more at the end. This step makes what I call a "trimmed" MPEG-2 file. The filename extension again is .mpg.
- Convert the trimmed file to MPEG-4. The new MPEG-4 container/wrapper file will have .mp4 as its filename extension. Internally, it needs to contain a copy of the original MPEG-2 video that has been converted to the H.264 encoding format. It also must contain a copy of the original digitally encoded audio converted to the AAC encoding format, so that the file will play properly on the Apple TV. In short, the original video/audio must be recoded.
 |
| VideoRedo TV Suite w/ H.264 |
 |
| Parallels Desktop 6 For Mac |
Installing Parallels Desktop takes a while, and then installing Windows in Parallels Desktop takes another long while — plus, you do have to buy a copy of Windows. Then you have to download and install VRD in Windows. Don't expect to rush right into any of this. Don't think it can be done on the cheap, either.
Before I go into more detail on how to do all this, a quick word about so-called "container" files. Here's a picture of one:
 |
| The components of a QuickTime container file |
This graphic comes from this one-page "Container vs. Codec" PDF, which discusses the geeky question of what the difference is between a container file and the codec or codecs that create its various component parts. In it, "QuickTime file" is being used synonymously with "MPEG-4 container file."
For purists: H.264 and AAC are actually better spoken of as encoding formats or encoding types, not codecs. There are various actual codecs that can produce, say, video output in the H.264 format. One of these codecs is called x264. But x264 is the codec, H.264 the encoding format or type.
That said, just about everybody uses the terms "codec" and "encoding format/type" interchangeably.
Now for more detail about how I do Steps 2 through 4 in the list I gave above:
In my Mac's WinXP VM window — i.e., in Parallels Desktop — I start VRD and click it's big blue Open Video button ...
 |
| The Open Video button is huge ... |
 |
| Here, I'm selecting the "Black Orpheus.TiVo" input file ... |
... that kmttg has transferred to my Mac. (The original recording date has been included by kmttg in the actual filename, but I'll omit it for purposes of this discussion.) This file is, of course, known to my Mac because it's sitting on one of its external hard drives. The WinXP VM can also see it and use it. Accordingly, VRD can do so, too.
VRD is capable of directly reading files such as Black Orpheus.TiVo that have been downloaded from a TiVo to a personal computer. With VRD, those files don't have to be decoded in a separate step, so Step 2 simply goes away!
VRD has flexible, easy-to-use video editing functions. It's easy to trim off unwanted material at the beginning and end of a video:
If you look closely at either end of the green part of the timeline, you'll see a red triangle. Those triangles were put there automatically by functions in VRD's Ad-Detective menu. Ad-Detective basically scans your video to find spots where the screen goes fully dark, which is called "video black." When there is a transition between two separate portions of the program-as-a-whole — say, between the actual program and a commercial — there is a brief fade to video black.
Ad-Detective puts a "scene mark" — a red triangle — at each point where the screen goes black. In a typical TCM movie recording, there are no spots in the middle of the movie where I need a scene mark, so I typically do the scan at the start of the recording, manually move the program cursor  to just before the end of the movie, and re-initiate the scan. I can fine tune the result by manually adding or removing scene marks at will. Then I use function keys F5 and F6 to move backward and forward among the scene marks that are generated. I can fine tune the result by manually adding or removing scene marks at will.
Once I have just two scene marks that bracket the actual movie I want to save, I:
With a little more effort, I would be able remove commercials from the middle of a TiVo recording ... except that TCM shows its movies commercial-free, so I don't need to go to any further trouble in this regard. Step 3 is way easy. Now it's time for Step 4.
 |
| I've selected (shown in green on the timeline) just the actual movie itself... |
If you look closely at either end of the green part of the timeline, you'll see a red triangle. Those triangles were put there automatically by functions in VRD's Ad-Detective menu. Ad-Detective basically scans your video to find spots where the screen goes fully dark, which is called "video black." When there is a transition between two separate portions of the program-as-a-whole — say, between the actual program and a commercial — there is a brief fade to video black.
to just before the end of the movie, and re-initiate the scan. I can fine tune the result by manually adding or removing scene marks at will. Then I use function keys F5 and F6 to move backward and forward among the scene marks that are generated. I can fine tune the result by manually adding or removing scene marks at will.Once I have just two scene marks that bracket the actual movie I want to save, I:
- Press F5 to get to the first of the two scene marks
- Press F3 to set that point as the start of my actual selection
- Press F6 to get to the second scene mark
- Press F4 to set the end point of my actual selection
- Press the Add Selection button to turn the timeline green between the start and end points
With a little more effort, I would be able remove commercials from the middle of a TiVo recording ... except that TCM shows its movies commercial-free, so I don't need to go to any further trouble in this regard. Step 3 is way easy. Now it's time for Step 4.
Step 4 is hard at first, but much easier after the first time you attempt it. Once I've finished selecting the portion(s) of the original video I want to save, I just click the Save As ... button that appears in the VRD window, thus bringing up a Save As file dialog. In that dialog I tell VRD what folder to save the output file in, and by what filename:
 |
| Here I'm saving my output file to my Desktop as "Black Orpheus" ... |
Notice that doing Step 4 right after Step 3 lets me bypass having VRD save the trimmed movie as an MPEG-2 file with filename extension .mpg, which saves me some time. Instead, I'm going to tell VRD to recode it straight away into a different format: the MPEG-4 container format.
But here's where things do get tricky.
They get tricky because I also need to tell VRD what output container and encoding formats to use.
Let's say the input file is Black Orpheus.TiVo. The .TiVo extension means the file is an MPEG-2 container file, but it's TiVo-encoded. (If it weren't TiVo-encoded, the extension would be .mpg.)
I want the output file to be an MPEG-4 container file, because that's what Apple TV needs. The MPEG-4 container/wrapper file will accordingly need to have an .mp4 extension. So I'll want to wind up with an output file called Black Orpheus.mp4.
That Black Orpheus.mp4 file will be playable in QuickTime Player on my Mac (or, for that matter, in QuickTime Player running under Windows in Parallels Desktop). It can be added to and will play in iTunes on either platform. And it can be played (via iTunes running on a Mac or in Windows) on an Apple TV.
To make sure the file works in a cooperative way with Apple-sanctioned software (iTunes, QuickTime) and hardware (Apple TV) requires some special care, however.
Just using an MPEG-4 wrapper file that has .mp4 as its filename extension isn't enough. I also have to make sure that the video and audio encodings that are contained within the wrapper file are of the right sort.
The video portion of the contents of the wrapper file has to use, specifically, the H.264 video encoding format. The audio portion has to use the AAC audio encoding format. Both encoding formats are supported by VRD, but I have to know how to select them and manage them properly. This is the trickiest part of all.
Here I again show my earlier dialog for saving VRD's output file:
|
| That Save As dialog, again ... |
Notice the "Save as type:" specification: "Apple TV H.264 MP4 (*.mp4)". It refers to an output profile that I myself created in VRD:
 |
| My "Apple TV H.264 MP4" Profile |
I created it by clicking on the Options button in the Save As dialog shown above. A form like the one immediately above opened. I filled in the various fields in it, using the values shown, and chose "Save as new profile." That let me fill in the "Apple TV H.264 MP4" profile name at the top of the form, and when I clicked the OK button, my new VRD profile got saved for future use.
From that point on, any time I saved an output file in VRD I could select "Save as type: Apple TV H.264 MP4" in VRD's Save As dialog. I could do so by clicking on the downward-pointing arrow at the right end of the "Save as type:" input field in the dialog to get a menu:

In the menu I could simply select my "Apple TV H.264 MP4" profile whenever I needed to produce an output file that would eventually be sent to an Apple TV.
Notice that (*.mp4) is shown as an indication of the filename extension that will be used by default for my Apple TV output file. That's the extension that goes along with the "MP4 File (Generic)" file type that you can (barely) see in the Edit Output Profile form above. This generic MP4 file type is actually what I referred to earlier as an MPEG-4 "container" or "wrapper" file.
Now, let's go back and take a look at the various settings I made in the "Apple TV H.264 MP4" profile shown earlier in my Edit Output Form screen snapshot:
- Output mode: Force Recode tells VRD to recode all parts of the input video, not just those that aren't already in the H.264 encoding format (which would be the case with Output mode: Intelligent Recode). In my situation, there is no H.264 material in the input, so this output mode choice would seem to make little difference. However, Force Recode lets me specify Avg Bitrate below, while Intelligent Recode does not.
- Max resolution: 960 x 544 tells VRD to make a video frame 960 pixels across by 544 pixels vertically. My TCM HD input is 1920x1088, so this involves reducing the output resolution by exactly half in each direction. The Apple TV does not support high-definition resolution at 1920x1088, aka 1080i/1080p video. It will play 720p video (1280x720), but I find I don't need the extra dollop of picture detail, and my assumption is that VRD can do its job faster if the output resolution is a simple fraction of the input resolution.
- Encoding mode: Single Pass Encoding keeps VRD from taking the extra time to do a 2-pass encoding, which might give me a slightly better picture ... but the picture I get with 1-pass is excellent.
- Avg Bitrate: 3500 Kbps tells VRD to hold the average rate at which the output video is to be decoded to a modest 3.5 megabits per second.
- Max bitrate: 5000 Kbps tells VRD to make sure the Apple TV never has to contend with trying to decode more than 5.0 megabits of video information per second. Restrictions on average and maximum bitrate reduce the picture quality somewhat, but they hold the size of the output file down as well and allow for faster streaming of the video across a network.
- Aspect ratio: No Change tells VRD to retain a 16:9 ratio for the width of the video frame to its height. My source material, at 1920x1080, has a 16:9 aspect ratio. The output is to have this same aspect ratio — which is the proper ratio for a widescreen HDTV.
- Deinterlace mode: Smart tells VRD what method to use to "deinterlace" the input video, which is originally in the 1080i format. 1080i video is "interlaced" — that's what the "i" stands for — which means each video frame is divided into odd-numbered and even-numbered rows of pixels. Every (approximately) 1/60 second, one of the two groups, called a video "field," is used. Then, in the next 1/60 second, the other field is used. Hence, you can't expect to unite the two fields into a single frame, since the second field is delayed with respect to the first. That means each output frame ought to be "deinterlaced" to get rid of messy picture details known as "interlace artifacts." The Smart method, I have found, works best for me. You can experiment with the other settings for deinterlace mode — None, Auto, BOB, and WEAVE — to see if you like them better.
- Framerate: No change means VRD will honor the frame rate of the source video — in my case, 29.97 frames per second. This is fractionally less than the 30 fps or 60 fields per second I talked about earlier. The reason for the fractional difference is quite technical ... but it doesn't really matter here. All you need to know is to tell VRD not to change the source video's frame rate in the output video.
- Audio encoding type: AAC tells VRD to re-encode the source audio to use the AAC encoding format that Apple TV expects.
- Bitrate: 128 Kbps tells VRD to limit the rate at which the Apple TV's audio decoder has to deal with audio information to 128,000 bits per second.
- Sample rate: No Change tells VRD that the output audio should provide "samples" at the same rate, measured in KHz, as the input.
- Compression: None tells VRD not to try to reduce the differences between very loud sounds and very soft ones.
- Normalization: None tells VRD not to try to turn up or down the overall sound level.
These are the parameters that will control what kind of output VRD will produce when I click on the Save button in the Save As dialog shown earlier.
As far as how long VRD will take to produce this output, this screen snap tells the story:

Yes, it does take some time.
Once the output process is complete, I will have a Black Orpheus.mp4 file sitting in the output folder I specified. This file can then be added to my iTunes Movies list, from which it can be streamed to my Apple TV. Mission accomplished.
* * * * *
There is one slight caveat, however. When I add my .mp4 output file to my iTunes Movies library, I like to go to the trouble to add poster art to it — something which can be easily enough done in iTunes's Get Info dialog, if I use my Web browser to Google to a suitable poster image, copy it to my Clipboard, and paste it into the Artwork pane of Get Info.
When I click Save, the Get Info window should promptly disappear, and the new poster art should promptly show up in cover flow in my Movies library.
Instead, it can take up to five minutes for all that to happen.
The reason has to do with how VRD incorporates into its MPEG-4/H.264 output file a geeky little thing called the "moov atom," which is, according to this discussion, "a self-contained data unit [within the video file itself] that contains information about the video file ... [It] defines the timescale, duration, display characteristics of the movie, as well as subatoms containing information for each track in the movie."
Depending on how the MPEG-4/H.264 output file is destined to be played, the moov atom is expected by the video player to be positioned in different locations within the file.
A frequent scenario is that used by an Adobe Flash Player for streaming video and/or so-called "progressive download" video. In this Flash-oriented scenario, the moov atom needs to be placed at the beginning of the file.
In other situations, the default location of the moov atom — the end of the file — works just fine.
VRD assumes the former scenario, expressly moving the moov atom to the beginning of the file.
Apple's iTunes, on the other hand, wants the moov atom at the end of the file. This appears to be the case even though the file will ultimately be streamed to an Apple TV.
It looks as if iTunes will leave the moov atom alone in a VRD output file that has been added to its Movies library ... until and unless you do something like try to add poster art to the file. In that case, iTunes will take it upon itself to move the moov atom from the beginning of the file to the end. That involves reading and rewriting the entire file, a time-consuming process.
The developers of VRD have hinted they may in some future release give users the ability to position the moov atom at the end of an MPEG-4/H.264 output file. Until that happens, we will have to put up with the irritating behavior of iTunes whenever it tries to move the moov atom on its own.
* * * * *
For more detail on how to use VRD on a Mac, see my earlier blog post Using VideoReDo TVSuite on a Mac.
You can learn more about the subject of videos that play in iTunes and on iPods, iPhones, iPads, and Apple TVs from The Complete Guide to Managing iTunes Videos at iLounge.com. The article is particularly useful if the TiVo recordings you want to play on Apple TVs or other Apple gear are not movies but TV shows, since the article tells you how to fill in the iTunes Get Info tags properly for TV episodes.
Mac users who, like me, need to convert video files from one digital format to another will also want to read iLounge's The Complete Guide to iPod, iPhone and Apple TV Video Conversion (Mac). (A version of the same article for Windows users is here.)
Users who run into the problem that iTunes and QuickTime will play certain video files without their accompanying audio will want to read iPod plays video but not audio of some exported files.
For geeks only: The Complete Guide to iPod Video Formats and Display Resolutions talks about the various file formats and encoding formats of digital video and audio; the various video resolutions, bitrates, and aspect ratios; and which ones work on which pieces of Apple gear (iPods, iPhones, Apple TVs — but no mention of the iPad, since the article preceded the advent of that device).
Thursday, February 3, 2011
Apple TV, Generation Two: Thumbs Up (w/ Reservations)!


Next, you see on the TV screen a list of WiFi networks from which Apple TV wants you to select one to join. You choose your network and enter a password if needed.
You then go to iTunes on your computer and turn on Home Sharing (Advanced menu -> Turn On Home Sharing). After you type in your Apple ID and password and click Create Home Share, all you have to do is click on the Done button.
Back at the Apple TV, you then use its remote to navigate to Settings > Computers, choose Turn On Home Sharing, and use the onscreen keyboard to enter your Apple ID and password.
That's it! Your computer will now show up under Computers in Apple TV's main menu. Just choose it, and you'll see on the TV screen a list of categories (Music, Movies, TV shows, etc.) that give you access to all your streamable goodies. The Apple TV is in business ... and you don't even have to tell iTunes to sync content to it.
That's because the new Apple TV does not have an onboard hard drive or any other kind of storage. You can't sync content to it. Everything it plays is streamed to it.
It streams any content which your computer's iTunes app has to offer — music, movies, TV shows, podcasts, photos, etc. Right out of the box, I tried Apple TV with iTunes movies and found it worked smoothly, much more so than my Gen One Apple TV ever did. One thing I liked especially: when you fast-forward through a movie, the new Apple TV lets you move into material that it has yet to buffer. The screen goes dark, but the time indicator at the bottom of the screen shows you exactly where you are. When you get to the point in time at which you want to resume play, you just press the remote's Play button and regular Apple TV streaming with picture and sound resumes instantly from that very point.
You can buy or rent movies and TV shows from the iTunes Store and watch them instantly. You can watch Netflix Instant streams and screen YouTube videos. You can listen to Internet radio. You can search for and view Flickr images. (Yet the new Apple TV doesn't do Pandora or Rhapsody!?!)
At the App Store, Apple offers an iPhone/iPad/iPod Touch app called Remote that lets your iDevice stand in for the Apple TV's remote control. One advantage: you don't have to be in the same room, so you can control (say) what track or playlist is playing while you are dicing onions in the kitchen. (Don't forget to wipe your hands first.)
 |
| Apple's promotional AirPlay image |
Tap the AirPlay icon seen at the right of the row of controls in the image above, and a menu pops up on the screen of the iPhone (or whatever iOS-based iDevice you're using) allowing you to redirect both audio and video to "Apple TV" (unless you've gone to the trouble to rename the device more descriptively). Like magic, the picture and sound start playing right on your TV, via the Apple TV. Technically, what's happening is that your iDevice is "pushing" the content to the Apple TV, which accepts and plays the content in the same way as it would if the Apple TV itself were "pulling" the content from iTunes on your home computer.
You can even use Apple TV's remote to do things like pause and resume playback, fast forward and reverse, go forward and back a chapter at a time, etc.
It's a neat trick, and it even works for YouTube. But — and this is my biggest gripe — for most other iDevice video players, including QuickTime running in Safari, it only forwards the audio, not the video, to the Apple TV. The video keeps playing, but it's on the little screen of the iDevice.
I was hoping to (see The Marvelous Air Video App: It Streams Videos from Your Mac or PC to iPhone/iPad/iPod Touch) get the Air Video app to do the AirPlay thing with both video and audio. No such luck. It forwards only the audio to the Apple TV. (Or maybe it is forwarding the video, but Apple TV is ignoring it.)
It's not a deal breaker, and I'm not going to return my new Apple TV for a refund. Yet it's an ugly fly in the ointment. Why in the world would Apple not get the AirPlay icon working identically for all video apps?
Here's more coverage of AirPlay with Apple TV, including more information about the flaw:
- Apple TV's AirPlay video--not quite fully baked
- AirPlay video: what works and what doesn't
- Hands on with AirPlay for Apple TV
- Video Support for AirPlay Is Limited in iOS 4.2
- Hands-on with AirPlay and Apple TV
CNET's review of the new Apple TV was filed before Apple delivered on its (at that time) still-promised AirPlay capability, so it doesn't mention the flaw ... but the review is still well worth reading.
BTW, a like anomaly is that you can use AirPlay to "push" photos stored on your computer to the Apple TV ... but AirPlay won't do the same for iPhone-shot photos and videos that are still stored on your iPhone.
You can use iDevice-based apps such as Pandora and Rhapsody to fill in for such capabilities as are regrettably missing on the Apple TV itself ... but the Apple TV will irritatingly display "Unknown Artist" and "Unknown Track" for music sent to it from such third-party music apps.
And, on the plus side, when you can get AirPlay to stream videos or audios properly from iDevice to Apple TV, you can then proceed to use your iDevice for other purposes such as browsing in Safari. AirPlay does its magic "in the background" on the iDevice.
What no one seems to know is whether the current glaring AirPlay-to-Apple-TV insufficiencies can simply vanish if Apple updates its iOS operating system that runs the iDevices, and/or the Apple TV software itself. If not, then app developers might have to re-jigger their apps to get it all working right ... not optimal, from the point of view of impatient users like me.
Or ... will this turn out to be a permanent gap between the ideal and the real, along the lines of iDevices' lingering inability to play Flash web videos?
Wednesday, February 2, 2011
The Marvelous Air Video App: It Streams Videos from Your Mac or PC to iPhone/iPad/iPod Touch

True, you need to be carrying an iPhone or iPad or iPod Touch. Air Video is an app for Apple iOS-based devices.
Air Video will stream videos from your Mac or PC to your iDevice. The videos can be in almost any format: .mp4, .m4v, .mov, .avi, .wmv, .asf, .mpg, .mpeg, .mkv, .3gp, .dmf, .divx, .flv. So if your video file has any of those geeky abbreviations as its filename extension, Air Video will probably play it.
The secret formula is that Air Video will do "live conversion" of videos in formats which the iDevice can't ordinarily play. For example, an iPhone can't play an .mpg video ... but Air Video can!
Air Video will not play DRM-protected videos that you buy at the iTunes Store. To play one of those, Air Video will ask you if you want to open it in Safari on your iDevice. If you agree, the video will play in your iDevice's version of Apple's QuickTime engine. This happens courtesy of a handoff of the video by the Air Video app to the Safari app on the iDevice ... but only if the iDevice has been authorized to play your DRM-protected videos.
Air Video playback on an iPod or iPhone looks like this:
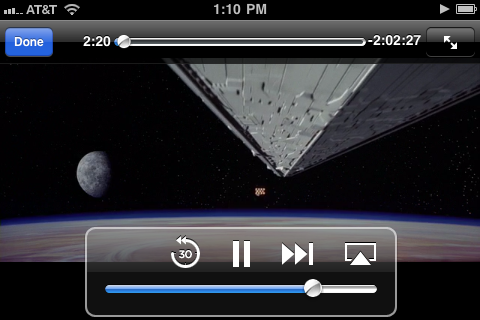

The Air Video app is fed by the Air Video Server running on a Mac or PC. On my Mac, upon being launched for the first time it installed itself as a Login Item that starts up each time my computer is booted, and then put its mini-icon in my menu bar:
 |
| Air Video Server's mini-icon is at left. |
Air Video Server Preferences
When Air Video Server is running in the background on my Mac, as it normally does, an item in its mini-icon's drop-down menu lets me view and modify Air Video Server's Preferences:
 |
| Air Video Server's "Shared Folders" Preferences Tab |
Air Video Server's "Shared Folders" preferences tab allows you to tell the server which of your Mac's folders (and all nested subfolders thereof) contain videos you want to stream to the Air Video app on your iDevice.
Remote Access
If you want Air Video to work when you are not at home and using your own WiFi network, you have to set up Air Video Server's "Remote" Preferences:
 |
| Air Video Server's "Remote" Preferences Tab |
This is where things can get tricky! A full rundown on how to do it can be read here.
Crucial to remote connection is This Server PIN. Mine (see above graphic) is 8** *** **5. (I am showing it here with asterisks replacing seven of the actual numbers so that online malefactors won't "steal" my video streams.) 8** *** **5 appeared as if by magic when I checked Enable Access from Internet.
Once I have my PIN, I simply can ...

... in the Air Video App on the iPhone. (I cribbed that image from the page I gave the link to earlier; it uses a different PIN than my own 8** *** **5.)
My WiFi router features NAT-PMP (which stands for "Network Address Translation - Port Mapping Protocol") support — but not UPnP (which stands for "Universal Plug and Play") support. Whatever those terms mean to true geeks, my home router's NAT-PMP support means to me that Air Video Server is telling my router the following: whenever the Air Video app on my iPhone asks for access to my PIN, send the request on to be honored by the Air Video Server, running on my Mac, itself. If I didn't check Automatically Map Port and get a PIN, that wouldn't happen.
If I had a router that lacks NAT-PMP or UPnP support, I'd have to do manual "port forwarding" to get Air Video to stream videos to my iPhone when I'm away from home. So it pays to have a router with NAT-PMP or UPnP support.
By means of the PIN, Air Video's away-from-home remote access works when you are at a WiFi hotspot. If WiFi is unavailable and your iDevice can get on the 3G cellphone network, remote access still works!
Full disclosure: though Air Video remote access works from almost wherever you are, if the network connection you are using is too slow, it may not work smoothly and reliably. Playback may start and stop and start and stop and start and stop ... . Remember, you've been warned!
Monday, January 31, 2011
Movies: TiVo to Mac to Apple TV & iPhone (Part II)
In Movies: TiVo to Mac to Apple TV & iPhone (Part I) I show how I move old movies cablecast on Turner Classic Movies HD from my TiVo Premiere to my Mac, via my home WiFi network, and then convert them to a video format which can be used by iTunes in order to feed my Apple TV.
What happens if I want instead to feed the movie to an iPhone?
In Movies: TiVo to Mac to Apple TV & iPhone (Part I), software called ImTOO HD Video Converter 6 (HDVC) converted my Gigi MPG.mpg movie file — the original TiVo recording, moved to my Mac and no longer DRM-protected — from its original MPEG-2 digital video format to the MPEG-4/H.264 digital video format. The output file was made by HDVC in a manner suited to an Apple TV — including the use of honest-to-goodness high-definition (HD) video in the output file.
But an iPhone can't and won't use the same MPEG-4/H.264 video output file as is appropriate for the Apple TV. The iPhone's small touchscreen is incapable of all that wonderful video resolution, and its onboard processor can't keep up with decoding an HD file's high bitrate. In fact, iTunes will simply refuse to sync the HDVC HD output file to an iPhone.
To get an output file that will sync to an iPhone, I need to use a different HDVC profile and make a second MPEG-4/H.264 copy of the movie:
I select HDVC's built-in iPhone - H.264 Video profile in the graphic above to get:
That profile would make the output video use Zoom: Letterbox — see the setting just above the little Preview window — which is not ideal. Better I should use:
Zoom: Full (Keep aspect ratio), which is now the Zoom: setting shown just above the small Preview window in the graphic above, is a better choice because the movie as originally recorded in my Gigi MPG.mpg movie file has a widescreen Cinemascope image. The film frame's aspect ratio is wider than that implied by Video Size: 480x320.
Below, I show how HDVC can actually Preview its output image and thereby see what Zoom: Full (Keep aspect ratio) does:
The black bars at top and bottom in the little image Preview window just below the Zoom: Full (Keep aspect ratio) selection are actually encoded into the output file — a waste of precious Bitrate.
If Zoom: Letterbox is used, the black bars get yet bigger:
So with Zoom: Full (Keep aspect ratio), there are fewer "black bar bits" cutting into the useful Bitrate of the video in the output file.
Unfortunately, the "image itself" as recorded from the TCM HD cable channel already contains the vertical black bars seen at left and right of the film frame in the Preview. They can't be removed. Also, even with Zoom: Full (Keep aspect ratio) there are some "black bar bits" above and below the image in the Preview. I don't yet know how to get HDVC to eliminate those entirely.
I can at least, though, save a new, user-defined profile that in the future I can use to automatically select Zoom: Full (Keep aspect ratio) for iPhone - H.264 Video output:
I simply click on Save As... and enter the profile name iPhone - H.264 Zoom Full, then click OK. After I do that, I can ...
... select my new Profile whenever I want to use it. Now the main HDVC window becomes:
Profile: iPhone - H.264 Video Zoom Full confirms that the new profile is is use. This profile employs Zoom: (Keep aspect ratio), exactly as intended.
Keep in mind that my going to all this trouble to remove a few "black bar bits" from iPhone-compatible output video is strictly optional on my part. You do not have to follow suit, if all you want is to get usable iPhone-compatible output.
Here is QuickTime Player's rendition of the Zoom: Letterbox video output with the extra "black bar bits" in it:
Below, the extra "black bar bits" have been avoided by means of using Zoom: (Keep aspect ratio):
Not only are the top and bottom bars smaller, the image itself shows up as wider. This is so despite the fact that both images have a nominal Video Size of 480x320 pixels!
How does this magic happen? The pixels in the "widescreen" version have been "squeezed" horizontally by HDVC, and QuickTime simply expands the pixels' width to make the image seem wider. And so does the iPhone, which, after all, uses QuickTime.
The experts call this kind of "squeezed-pixel" encoding of the video image "anamorphic." When the image is instead enclosed in a "letterbox," the pixels are not "squeezed" horizontally, and the player won't "unsqueeze" them for a wider aspect ratio.
One advantage of using anamorphic encoding rather than letterbox is that the playback image on an iPhone can be expanded slightly by double-tapping it — albeit with the sides of the image being cropped. A letterbox image cannot be so expanded on an iPhone.
Whether or not you use anamorphic encoding in your iPhone-compatible output from HDVC, the file that HDVC creates is quite small. My high-definition input file for Gigi was 8.42 gigabytes in size. The iPhone-compatible anamorphic output file used only 968 megabytes. The output file is only 11.5 percent of the size of the original file! I can get over eight of those iPhone-compatible output files in the same hard drive space as the original file takes up!
What happens if I want instead to feed the movie to an iPhone?
In Movies: TiVo to Mac to Apple TV & iPhone (Part I), software called ImTOO HD Video Converter 6 (HDVC) converted my Gigi MPG.mpg movie file — the original TiVo recording, moved to my Mac and no longer DRM-protected — from its original MPEG-2 digital video format to the MPEG-4/H.264 digital video format. The output file was made by HDVC in a manner suited to an Apple TV — including the use of honest-to-goodness high-definition (HD) video in the output file.
But an iPhone can't and won't use the same MPEG-4/H.264 video output file as is appropriate for the Apple TV. The iPhone's small touchscreen is incapable of all that wonderful video resolution, and its onboard processor can't keep up with decoding an HD file's high bitrate. In fact, iTunes will simply refuse to sync the HDVC HD output file to an iPhone.
To get an output file that will sync to an iPhone, I need to use a different HDVC profile and make a second MPEG-4/H.264 copy of the movie:
 |
| Selecting iPhone - H.264 Video Profile |
I select HDVC's built-in iPhone - H.264 Video profile in the graphic above to get:
 |
| HDVC Set Up for Converting for iPhone |
That profile would make the output video use Zoom: Letterbox — see the setting just above the little Preview window — which is not ideal. Better I should use:
 |
| Using Zoom: Full Instead |
Zoom: Full (Keep aspect ratio), which is now the Zoom: setting shown just above the small Preview window in the graphic above, is a better choice because the movie as originally recorded in my Gigi MPG.mpg movie file has a widescreen Cinemascope image. The film frame's aspect ratio is wider than that implied by Video Size: 480x320.
Below, I show how HDVC can actually Preview its output image and thereby see what Zoom: Full (Keep aspect ratio) does:
 |
| Preview shows black bars at top and bottom |
The black bars at top and bottom in the little image Preview window just below the Zoom: Full (Keep aspect ratio) selection are actually encoded into the output file — a waste of precious Bitrate.
If Zoom: Letterbox is used, the black bars get yet bigger:
 |
| Letterbox bars bigger with Zoom: Letterbox |
So with Zoom: Full (Keep aspect ratio), there are fewer "black bar bits" cutting into the useful Bitrate of the video in the output file.
Unfortunately, the "image itself" as recorded from the TCM HD cable channel already contains the vertical black bars seen at left and right of the film frame in the Preview. They can't be removed. Also, even with Zoom: Full (Keep aspect ratio) there are some "black bar bits" above and below the image in the Preview. I don't yet know how to get HDVC to eliminate those entirely.
I can at least, though, save a new, user-defined profile that in the future I can use to automatically select Zoom: Full (Keep aspect ratio) for iPhone - H.264 Video output:
 |
| Saving an HDVC Profile |
I simply click on Save As... and enter the profile name iPhone - H.264 Zoom Full, then click OK. After I do that, I can ...
 |
| Selecting the new Profile |
... select my new Profile whenever I want to use it. Now the main HDVC window becomes:
 |
| New Main HDVC Window |
Profile: iPhone - H.264 Video Zoom Full confirms that the new profile is is use. This profile employs Zoom: (Keep aspect ratio), exactly as intended.
Keep in mind that my going to all this trouble to remove a few "black bar bits" from iPhone-compatible output video is strictly optional on my part. You do not have to follow suit, if all you want is to get usable iPhone-compatible output.
Here is QuickTime Player's rendition of the Zoom: Letterbox video output with the extra "black bar bits" in it:
 |
| "Letterbox" Version of the Gigi Image in QuickTime |
Below, the extra "black bar bits" have been avoided by means of using Zoom: (Keep aspect ratio):
 |
| "Widescreen" Version of the Gigi Image in QuickTime |
Not only are the top and bottom bars smaller, the image itself shows up as wider. This is so despite the fact that both images have a nominal Video Size of 480x320 pixels!
How does this magic happen? The pixels in the "widescreen" version have been "squeezed" horizontally by HDVC, and QuickTime simply expands the pixels' width to make the image seem wider. And so does the iPhone, which, after all, uses QuickTime.
The experts call this kind of "squeezed-pixel" encoding of the video image "anamorphic." When the image is instead enclosed in a "letterbox," the pixels are not "squeezed" horizontally, and the player won't "unsqueeze" them for a wider aspect ratio.
One advantage of using anamorphic encoding rather than letterbox is that the playback image on an iPhone can be expanded slightly by double-tapping it — albeit with the sides of the image being cropped. A letterbox image cannot be so expanded on an iPhone.
Whether or not you use anamorphic encoding in your iPhone-compatible output from HDVC, the file that HDVC creates is quite small. My high-definition input file for Gigi was 8.42 gigabytes in size. The iPhone-compatible anamorphic output file used only 968 megabytes. The output file is only 11.5 percent of the size of the original file! I can get over eight of those iPhone-compatible output files in the same hard drive space as the original file takes up!
Subscribe to:
Posts (Atom)

