iTunes Notes

Wednesday, May 2, 2012

Using My Mac as a DVR

I've recently found good way to use my Mac as a DVR! I use an Elgato EyeTV HD ...


... to pull TV programs off a Verizon FiOS set-top box and put recordings of them in my iTunes library. The recordings will then stream to my Apple TVs and also my iPad and iPhone!

Check out "Using My Mac as a DVR" here for more about this exciting development ...

Wednesday, November 23, 2011

iTunes Match: First Impressions

Here are my initial impressions of Apple's new piece of Internet wizardry, iTunes Match.

iTunes Match is a new feature of iTunes for the Mac, and also for the PC, beginning with iTunes 10.5.1. iTunes now can store your entire iTunes Music library in the online "cloud," in addition to — or rather than — storing it all on your own computer.


I presently have over 16,000 music tracks in my iTunes Library on my main computer, an iMac. My iTunes Music folder takes up over 137 gigabytes on an external hard drive of the iMac. It's only sporadically backed up, alas ... and I hate to think what would happen to my music collection if the drive died.

I fired up iTunes 10.5.1 after it arrived on my iMac via Software Update. Following these "How to subscribe to iTunes Match" instructions, from the iTunes Store menu I chose Store > Turn On iTunes Match. From the main iTunes screen, I clicked "Subscribe for $24.99" in order to have my PayPal account debited by that amount in return for a one-year iTunes Match subscription.

Since I wanted to use my existing Apple ID for iTunes Match, I signed in with that ID and clicked Subscribe. If you want to create a different Apple ID for iTunes Match, read this article to find out how. But I suggest you are better off not to do that, because all tracks you've bought from Apple using your existing ID will not count against the 25,000-track limit on the number of songs your subscription allows you to store in the iCloud.

There was then the typical rigmarole in which I had to accept Apple's terms and conditions for using iTunes Match. Once I did that, iTunes immediately began scanning my music library for "matches."

That involved figuring out for each of my 16,000+ tracks whether it was already available "in the cloud." Any of my tracks that is found in the iTunes Music Store would automatically be matched — whether or not the iTunes Store was the original source of the track!

So any track ripped from a CD or purchased from Amazon.com might (or might not) get successfully matched. It would thenceforth be considered "matched" by iTunes.

Any track I've actually purchased from Apple's iTunes store would normally be seen as "purchased," rather than "matched."

If a track didn't get seen as matched or purchased, then in the next phase of iTunes Match setup, it got uploaded from my iMac to Apple's iCloud, which means it got stored on one of Apple's incredibly huge number of "cloud" servers in its new $1-billion facility in Maiden, North Carolina. It would thenceforth be marked as "uploaded" by iTunes.

Problems and Oddities

For inscrutable reasons, often iTunes was able to match only some of the tracks in any given one of my albums, and then it had to upload the rest of the tracks from that same album. This probably makes no practical difference to me, but I'm guessing the non-matched tracks should have been matched; not doing so means Apple's iCloud servers will now be hosting unnecessary duplicates of some of my songs.

Also, I found that a tiny handful of my existing tracks wound up being shown in iTunes as both matched and purchased, with the purchased versions awaiting downloading(!). In a very few cases, tracks were shown as purchased but not yet downloaded, and there was no "matched" version shown. I simply deleted the redundant "purchased" versions, if there was a "matched" version. Those "purchased" tracks that were not redundant with "matched" tracks I simply told iTunes to download immediately.

I have no real idea why a tiny handful of my tracks were mishandled in those different-but-similar ways. It might have had to do with the fact that my iTunes crashed one time in the middle of initializing iTunes Match. I had to restart my iMac and then re-initiate the iTunes Match setup process. The process seemed to take up where it left off, with no apparent snags or repeats ... but who knows? Maybe it dropped the ball with respect to a tiny few of my tracks.

Benefits

I believe that a hard drive crash on Songcatcher 2, the volume where my iTunes Library is stored, would be fully recoverable now. From the cloud I'd be able to download all of my tracks — originally purchased from Apple, successfully matched, or otherwise — and restore my library in full.

Once my music library had been scanned and every track had been marked as purchased, matched, or uploaded during the setup process, I found that all of those tracks could be streamed from the iCloud directly to all of my Apple devices: my main iMac, via iTunes; my MacBook, again via iTunes; my iPad; my iPhone; and either of my two Apple TVs.

The tracks could also be downloaded from the iCloud to any of those devices — though that option was of course irrelevant on my main iMac, the one from which the scanned tracks originally came.

Streaming/downloading from the iCloud accordingly means no more syncing of devices such as the iPad or iPhone (or of an iPod, if I used one of those). That's extremely nice.

iCloud Tips

(1) You'll surely want to keep track of the "iCloud status" of your music tracks. In iTunes, while viewing your music library in List or Album List view, choose View > View Options and enable "iCloud Status":


(See these troubleshooting hints from Apple for more about this.) Also, make sure "iCloud Download" is duly checked. Between the two, you'll be able to see two extra columns in List or Album List view showing the main music library in iTunes. Here is what they look like on my MacBook, which is my second computer and not the original location of my music tracks:


At the right of the image, you see a column with a cloud icon at its top. That's the "iCloud Download" column. Next to it is the "iCloud Status" column.

In the "iCloud Download" column in the image above you see this icon: . It means my "Please Remember Me" track is in the cloud and can be downloaded to my MacBook if I ever wish to do so. Note that the "iCloud Status" is shown as "Purchased" ... but other tracks which are marked "Matched" or "Uploaded" are similarly shown as being downloadable, if I ever choose to download them to the MacBook.

Clicking on the  icon is one way that I can initiate a download of a track from the cloud, and if I click on it, the download begins instantly. It will, I find, be finished in just a second or two.

You can find out about the  icon and the other icons that can show up in the "iCloud Download" column in this Apple technical support document.

(2) You'll need to tell your devices such as another computer, an Apple TV, or an iOS 5.0 device (iPad, iPhone, or iPod Touch) that you want them to access your music in the iCloud.

If the device is a computer or an iOS device, read this Apple support document to find out how to do so. Notice that each computer whose iTunes you turn iTunes match on for will do its own initial scan for tracks to match/mark-as-purchased/upload. So your music collection, if it spans multiple computers, can now be consolidated in the cloud.

If the device is an iOS device that has it's own onboard music library, its independent tracks will not be merged into the iCloud until such time as you sync them to one of your computers and, in iTunes, select Store > Update iTunes Match.

On iOS devices, if you want to stream or download music tracks from the cloud and you do not currently have an active WiFi connection, you'll need to go to the Store entry in Settings on the iOS device and turn on "Use Cellular Data."

As for the second-generation Apple TV — sorry, the 1st-generation product lacks this capability — a new Music menu offers iTunes Match access:


Once you select "Turn on iTunes Match," you're asked to type in your Apple ID and password, using the Apple TV's virtual keyboard. Then you see:


This "preparing your iCloud library" takes several minutes, in my experience. It was, for me, complicated by the Apple TV's insistence on presenting me with a request to download yet another new version of its operating software seemingly while the iTunes Match "preparing" stage was still in progress. I assented, the new version duly downloaded and installed itself, and I found that the iTunes Match "preparing" stage was actually fully complete.

(While I'm kvetching, I might as well complain that the "original new Apple TV version," if I may call it that, had wiped out some of my important Apple TV setting customizations ... I had to type in my Apple ID and password anew, as well as re-select my network connection preference and certain other settings that I'd prefer not to have had to dig into, just as a result of doing a version update.)

Once you get iTunes Match set up on an Apple TV, the main menu's Music submenu looks like this:


You will find that selecting "iCloud Library" from it produces a familiar-looking result:


Summary

iTunes Match puts all your iTunes music "in the cloud" for $24.99 per year. You can play it on or download it to all of your computers, your Apple TV(s), and your iOS 5.0 devices (iPad, iPhone, iPod Touch). What's not to like!

More Information

An invaluable further introduction, "Secrets & Features of iTunes Match," can be read at the iLounge website here.


Sunday, October 9, 2011

Use the Splashpad App to Watch Amazon Instant Video on iPad

In Use the Photon App to Watch Amazon Instant Video on iPad I showed a neat way to look at Amazon Instant Videos on an iPad: use the $4.99 Photon Web browser app for the iPad. Photon's a good iPad app to have, since Amazon videos use Adobe Flash technology, and the iPad doesn't natively support Flash.

I've found a new way. It has some advantages and some disadvantages ...

The new way involves using Splashtop Remote Desktop App for iPad. It's an iPad app I bought for $2.99 (its icon is shown at left) that lets the iPad see and manipulate anything on the screen of a Mac or PC.

That is, using standard iPad taps and gestures, you can perform the equivalents of various mouse/trackpad taps, clicks, and drags of the sorts typically used on a Mac or PC. The popup keyboard of the iPad stands in for the actual keyboard of the Mac or PC. So anything you can do while sitting at your computer, you can do from your iPad.

One of the things you can do, working entirely from the iPad, is bring up a Web browser on the host computer and, in one of the browser's windows, play an Amazon Instant Video. You'll see (and hear) the playback of the video on your iPad!

(Click on this and following images to see them at original size.)

From the iPad you can tap Amazon's Full screen control at lower right of the browser window ...


 ... to expand the video so that it fills the iPad screen:


To do this, you'll need to install the free Splashtop Streamer app on your Mac or PC. There are two versions of the streamer, one version for the Mac OS X version 10.6.x or 10.7.x ("Snow Leopard" or "Lion") and one version for Windows 7, Vista, or XP. I'm using the Mac version. (Note that there is no version of Splashtop Streamer for Mac OS X 10.5.x "Leopard.")

After I installed Splashtop Streamer on my Mac, there was a new icon in my Mac menu bar. Clicking it produced this drop-down menu:


The Splashtop Streamer preferences panel opened on my Mac's screen immediately after I'd done the install. The panel has four tabs (in addition to the About tab, which I don't show here). Here are the four tabs after Splashtop Streamer had been fully installed and set up on my Mac:


Again, the above four screen snaps reflect the tabs' content after I had done the initial setup, including activating the Splashtop Remote Desktop app on the iPad, as illustrated here:


If you get tired of seeing the Splashtop Streamer preferences panel, you can dismiss it by clicking on its red close button. If you want to summon it back, you can select Preferences from the Splashtop drop-down menu I showed earlier.

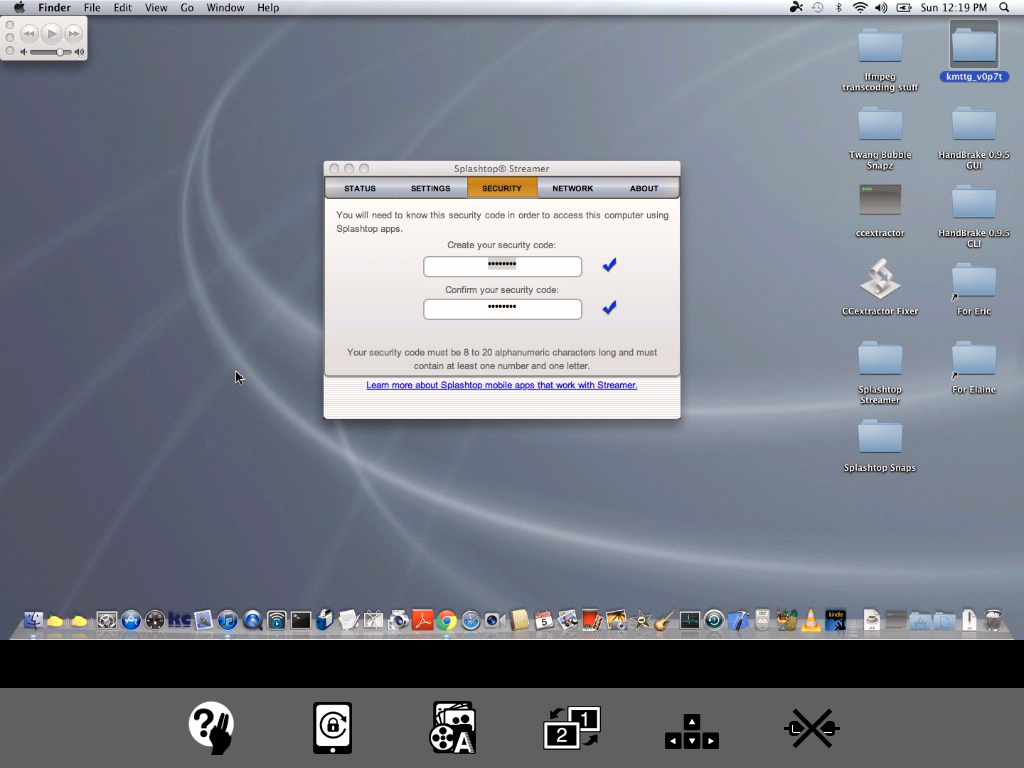
Setting up the Splashtop Streamer app on a computer

When I first installed the Splashtop Streamer, its preferences panel automatically opened to the Security tab and asked me to enter and confirm a security code. It was a code that I made up myself, and that my iPad app would use to identify itself securely to the streamer. The security code, then, is just a glorified password.

Once I had done that, the Status tab that I've already shown above automatically appeared. It gave two Internet Protocol — or "IP" — addresses:

  • 10.0.1.2 LAN
  • 10.0.1.12 WIFI

The first refers to my Mac's Ethernet port, the second to my Mac's WiFi port. These IP addresses will be different on your home network. They are mostly purely informational, by the way. You don't really have to use them, as long as you intend to use Internet discovery (described below) to allow your iPad to connect to your computer automatically.

If I clicked on the Settings tab, I saw the settings pane I already showed above. I found there was no need to use the Advanced Settings button.

As for the Network tab, that one is important. To get it to work, I had to set up a Gmail account, because the Google e-mail field of the Network tab doesn't work unless it contains ______________ @ gmail.com. The Password field, of course, had to match the password I'd set up for my Gmail account.

Once I had done all that, I clicked on the Sign In button, and I was duly signed in to my new Gmail account. The Sign In button turned into a Sign Out button.

Why is that Network tab so important? Because the Splashtop Remote Desktop app on the iPad can do something called Internet discovery to find its companion Splashtop Streamer app from any remote location. Once you've installed the pair of Splashtop apps as I'm showing you here, you don't need to be using your iPad at home to get the Splashtop Remote Desktop app to work. You can access and manipulate the screen contents of your computer from anywhere you find a WiFi hotspot. It will also work using a 3G connection, if your iPad has 3G.

The way it does Internet discovery is to go through the Gmail account! Don't ask me how that works ... but it does!

Setting up the Splashtop Remote Desktop app on an iPad

After you've installed the streamer app, it's time to purchase and install the Splashtop Remote Desktop app on the iPad. When you first start this app up you see ...


You touch the Go button and see ...


This represents a screen into which you must enter and confirm the security code you entered into the Security tab of Splashtop Streamer. You do so and tap Continue, resulting in ...


You tap Finish and are presented with a dialog asking whether you want to provide anonymous usage statistics, etc., to help improve Splashtop remote. You can answer "No" or "Yes" at your discretion.

Then you see (in my particular case) ...

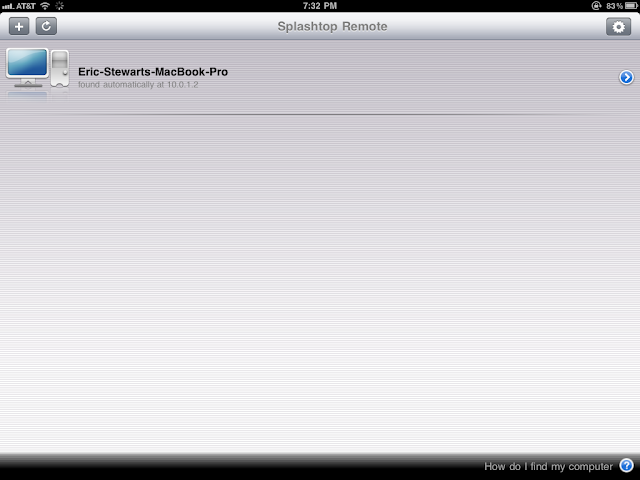
This is what I call the Splashtop Remote control screen.

It indicates that Eric-Stewart's-MacBook-Pro was automatically found at IP address 10.0.1.2 on my home WiFi network.

I tapped the ">" icon at the right and saw ...


I again entered the security code I'd established earlier in the streamer app. Then I tapped Advanced and saw ...


After some experimenting, I was able to determine that the Use computer's native display setting is more pleasing to me than the default 1024x768 best fit resolution setting, so I selected it and tapped Back, and then Save.

Then I tapped the "gear" icon at the upper right of the Splashtop Remote control screen and saw ...


As I indicated earlier, I want to use Internet discovery to allow Splashtop Remote Desktop on my iPad to find Splashtop Streamer on my MacBook via the Internet automatically, so I tapped Not signed in to bring up ...


On that screen I entered the Email address and Password that I had already established for my Gmail account, and then I tapped Sign in. The result was ...


When I now tapped Back I saw ...


I tapped Back again and then tapped the Eric-Stewart's-MacBook-Pro icon, getting the following Hints screen ...


This screen gives a rundown on the equivalencies between iPad finger gestures and mouse actions on the host computer:
  • Tapping with one finger at a spot on the iPad screen = a left-click with the mouse on the corresponding spot on the host computer screen
  • Holding one finger at a single spot on the iPad screen = a right-click with the mouse
  • A two-finger tap = a mouse-over (i.e., moving the mouse to a spot on the host computer screen and leaving it there)
  • A two-finger drag = a window scroll operation on the host computer
  • A three-finger drag = a screen pan operation on the iPad (not on the host computer)
  • A three-finger tap = the way to bring up Splashtop Remote Desktop's controls on the iPad (more about this momentarily)
I tapped Continue and saw ...


I was seeing the screen of my MacBook on my iPad!

Notice the little "keyboard" icon at lower right. It's the way to bring up the Splashtop Remote Desktop app's popup keyboard ...


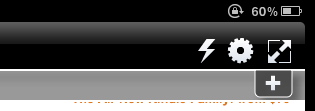
After dismissing the popup keyboard by tapping the "dismiss" icon at lower-right, I could tap with three fingers on the iPad's screen to bring up an array of Splashtop Remote Desktop's controls at the bottom of the iPad's screen ...


These icons' uses are:
  • The first (leftmost) icon brings up the Hints overlay I showed earlier
  • The second icon enables Splashtop Remote Desktop's rotation lock, so reorienting the iPad physically will not reorient the screen image
  • The third icon toggles between Sharp and Smooth video renditions
  • The fourth icon swaps between two (or more) computers that are running the Splashtop Streamer app
  • The fifth icon brings up/dismisses a set of virtual Up, Down, Right, and Left controls in the iPad screen to mimic the corresponding keys on the computer's keyboard
  • The sixth (rightmost) icon returns to the Splashtop Remote Desktop control screen, from which you may either re-select your host computer or select a different computer (if you have one)
To watch Amazon Instant Videos, I simply tap the Google Chrome icon shown in the dock at the bottom of the screen image. In order to do that easily, I used an iPad gesture that is not shown in the Hints. If I use a standard iPad two-finger "pinch" gesture, I can enlarge any portion of the screen image I want:


I am actually spreading, rather than pinching, my two fingers when I do this, and I also slide the two spread fingers around on the iPad screen so the portion of the original screen image that I want to use is the one that I see. Once I see it, I can tap the Chrome icon (which in the above image indicates that Chrome is already open on my MacBook, but its windows are hidden). I see:


The screen image on the iPad needs to be returned to its normal magnification. I use a two-finger "pinch" to accomplish this, and I see:


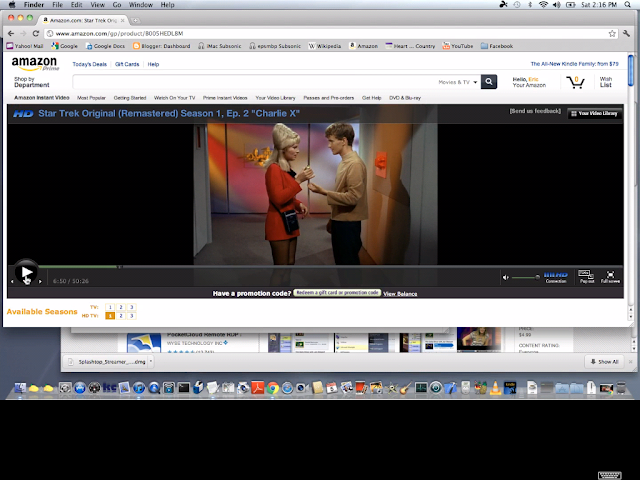
It just so happens that I already had this Chrome window set up to display the Amazon.com page associated with a particular episode of the original Star Trek series. But if this window were not already set up, I could use Splashtop Remote Desktop to locate the desired video at the Amazon website via Chrome on the MacBook computer.

Remember, everything you can do while sitting at your computer, you can do on the iPad. I'm not saying it's always intuitive or easy, but you can manage it.

Or, as I've done, I used my actual MacBook computer in its usual way to locate the video I wanted to watch, and then I used Splashtop Remote Desktop to view it on the iPad. I just tapped on the green "Watch Now $0.00" link and saw:


This was just a temporary "Connecting ... " advisory. It disappeared in a few seconds, and I saw an image like the very first one I showed in this blog post. I could then tap the Full screen control I showed in the second image above, and I saw a high-quality picture like the one I showed in the third image.

Using Splashtop from a Remote Location

Because of its Internet discovery feature, Splashtop easily connects your iPad to your host computer from any remote location where you can log on to a WiFi hotspot. It also connects via a 3G cellular network, if your iPad supports 3G.

The only real difference ...


... is that my MacBook is "found automatically," not "found automatically at 10.0.1.12," according to the Splashtop remote control screen.

When I play an Amazon Instant Video on my iPad while I'm at a remote location, the video can get choppy. I believe that happens because of limitations on how much data I can push across the Internet in any given amount of time. For example, when I am at Panera the WiFi hotspot sometimes gets loaded up with numerous users. Then, if there are brief hiccups in the data flow, the video can look choppy. Even so, it's still quite watchable.

Advantages and Disadvantages of Splashtop

Using Splashtop Remote Desktop on the iPad and Splashtop Streamer on a Mac or PC has certain advantages and disadvantages, when compared with the Photon web browser app, as a way of viewing Flash-based Amazon Instant Videos. Advantages of Splashtop:
  • The Photon app's method of supporting Flash video is to shunt it to a Photon server somewhere, convert it to a video format the iPad can use, and send it to out the iPad. Video quality is reduced in the process. Splashtop gives you as close to the original video quality as the iPad screen can support. The improvement vis-à-vis Photon is quite noticeable.
  • Splashtop lets you look at anything that can appear on your host computer's screen, even if it's not in a web browser. So you can also watch iTunes videos. For that matter, you can utilize any screen content whatsoever, video or otherwise.
  • Splashtop is probably quick enough to let you play Flash-based interactive games online from your iPad. (I haven't tried it, so I can't be sure of this.) Photon's way of utilizing Flash-based material seemingly imposes lag times that are too long for interactive games.
Disadvantages of Splashtop:
  • Installing Splashtop on a host computer and on the iPad and getting it all working can be an arduous process. If you visit the iPad/iPhone/iPod touch section or the (say) Mac Streamer section at the Welcome to Splashtop Remote Support! web page, you'll see how many users have had difficulty getting Splashtop working.
  • With Splashtop, you'll have to learn to mentally translate iPad gestures to equivalent mouse actions on the host computer. It takes some getting used to.
  • To run the Splashtop Streamer app, you have to have a computer running Mac OS X version 10.6.x or 10.7.x ("Snow Leopard" or "Lion") or Windows 7, Vista, or XP. Mac OS X 10.5.x "Leopard" is not supported. Neither are Windows 98, Windows 2000, Windows Me, or any Windows version other than those I've just listed.
  • The host computer running Splashtop Streamer can't reasonably be used for any other purpose at any time that Splashtop Remote Desktop for the iPad is being used. If there are multiple users of the computer in a household, the other potential users have to wait.
  • I have found that occasionally when I am using the Splashtop Remote Desktop app from a remote location, the audio lags the video by an annoying amount of time — say, 3-4 seconds. I find that I can usually exit and re-enter the Splashtop Remote Desktop app and get the audio back in sync, but it's an irritating problem whenever it crops up.
  • I have also tried using Splashtop Remote Desktop to watch Netflix videos. It has a problem if I try to use the Full Screen feature. Unlike the similar feature on Amazon, Netflix full screen video flickers annoyingly when viewed in Splashtop Remote Desktop for the iPad. If you watch Netflix videos using Splashtop Remote Desktop for the iPad without enabling Full Screen, everything is fine. This is not a major problem because I can watch Netflix videos using the Netflix iPad app.
That's about it! All in all, Splashtop is a big help for those of us who like to watch Flash-based Amazon Instant Videos on an iPad.

***

P.S. Since I posted this, the price of the Splashtop Remote Desktop app has dropped from $2.99 to $1.99.

At AppShopper you can get more information about Splashtop apps. The listing for the Splashtop Remote Desktop app is here. Notice that the "regular price" is shown as $19.99, with $1.99 a "limited time" offer.


Friday, September 30, 2011

Use the Photon App to Watch Amazon Instant Video on iPad

Amazon Prime customers such as myself can watch numerous Amazon Prime Instant Video titles for free. As a semi-old fogey, I just watched an episode of the fairly recent Doctor Who revival (with Christopher Eccleston as "The Doctor") and one of the original Star Trek series ... and I did it all on my iPad!

That's quite a feat, since Amazon Instant Videos use Adobe Flash technology, and the iPad doesn't support Flash.

The secret is Photon. The Photon Flash Web browser app for iPad ($4.99; icon at left) is an alternative browser that you can use on the iPad. You can use Safari most of the time, that is, but fire up Photon when you need to watch a Flash video. Or you can just use Photon as your main iPad browser, since it is a full-featured web browser.

There is also a Photon Flash Web browser app for iPhone that costs $3.99. It does the same kinds of things as the $4.99 iPad version, but it is iPhone-specific. It runs on the iPad, as well, but does not take advantage of the larger screen (for instance, no tabbed web pages). These two versions are very hard to tell apart at the App Store; be careful to get the one you want for the device you have. Remember: the iPad version does not run on an iPhone, while the iPhone version does run on an iPad, but does not use the larger iPad screen to best advantage.

Photon uses a neat workaround. When you watch a Flash video, it diverts the containing web page to its own web server, somewhere out there in the cloud. Then, working on the fly, it converts the Flash-based source video stream referenced in the web page into a video format the iPad can use, and it inserts the converted stream into a modified version of the original web page. Then it sends the modified web page out to the iPad. The converted video is thereby the one you see in Photon.

Will Photon let you play a Flash-dependent, interactive online game, by the way? I don't know. I haven't tried it. But I suspect it imposes unacceptably slow lag times, and that Photon's Flash compatibility is best reserved for streaming video.

Here's an iPad screen snap of an Upstairs, Downstairs episode that I paused in Photon:


I accessed the episode using Photon in its "normal" — i.e., not Flash-enabled — mode:


The presence of the "lightning" icon at upper right indicates that Photon is operating in its "normal" mode. My next move would normally be to touch the green "Watch now $0.00" button, but if I don't touch the "lightning" icon first, I see:


The "Flash player is not installed" message alerts me to touch the "lightning" icon, and I briefly see:


The "Connecting to streaming session for browsing Flash websites" overlay appears only temporarily, and then I see:


It looks almost like the screen shot I showed earlier in this post, three images above this one. But now the set of icons at upper right has changed from:

Not Flash-enabled.


To:

Flash-enabled. To enable Flash, I touched the "lightning" icon
shown in the previous image.


If I were now to tap the third icon from the right, by the way, I would go back to Photon's "normal," non-Flash-enabled mode.

The Amazon Instant Video player has various controls arrayed at bottom right (also see the first image in this post):


These controls disappear after a few seconds of screen inactivity,
but if you tap the video image on the screen, they reappear.


One of the drawbacks of the way Photon supports Flash is that the Adjust volume, Pop out, and Full screen controls are often hard to use and in some cases don't seem to work right at all. One of the problems is that there is considerable lag time between when I tap the screen and when the tap produces a result.

For example, it's very hard to adjust the volume. The workaround is to switch from Photon's "touch mode":


This is "touch mode." The "fingertip" icon is selected.

To its "pointer mode":

This is "pointer mode." The "arrow" icon has been selected.


Now I can drag my physical fingertip across the iPad screen to manually place an arrow cursor at the rightmost end of the volume slider:


Then, after I tap the screen once, the volume slider responds normally:


As for Amazon's Full screen control ...


... it gives weird results that I'm not going to reproduce here. I don't know how to use it to give a proper full-screen view of the video. I recommend not using it in Photon on the iPad.

Amazon's Pop out control in intended to play the video in a popup window, when used with a regular computer browser. In Photon for the iPad it enlarges the video within the original browser tab:


But, annoyingly, the controls at the bottom are partly obscured. Even if they weren't, they provide no way to pop the video back into its usual player. One way to do that is to pause playback by touching the (partially obscured) Pause button at lower left, then hit the Back arrow at upper left. The video will then show up (paused) in its regular player, and will take up where I left off if I hit the Play button at lower left.

If I use Pop out and then I touch the rightmost icon ...


... to expand Photon itself into full screen mode, then I actually get a full screen image:


I can tap the "expand" icon again (shown at upper right in the image above) to go back to ordinary not-popped-out mode.

Now, something that's really annoying:


This is what happens sometimes for no discernible reason. "Online Viewing Limit Reached" supposedly happens when you are trying to watch more than two videos at a time across all your devices — iPads, iPhones, computers, etc. But I've been getting it when I'm just trying to watch one video on one device, my iPad, using Photon.

Alas, hitting "Retry" never works to clear up the problem.

I suspect the problem must have to do with how Photon buffers the original video stream that it pulls over from Amazon's servers to its own servers. Something gets out of sync, and Amazon thinks I'm trying to access more than two copies of the stream.

I have tried every conceivable thing to get things working again, with no consistent success. Closing out the Flash-enabled session, closing Photon's tab for that session, going back to Amazon's home page and drilling down all over again to the video, exiting the Photon app, restarting the iPad — none of these seem to work.

However, the problem does seem to go away if I wait a few minutes and try again. Maybe the out-of-sync session between Photon and Amazon simply times out. I have no idea, really, what's going on.

I expect the developers of Photon will in some future release fix this and the other problems I've mentioned. Meanwhile, I have to say that it's extremely nice to be able to use Photon to play Flash-based streaming videos from Amazon Instant Video on my iPad!